
Heyy! This post will be about step by step mountain drawing. I really really love drawing mountains. In previous posts, I’ve shared some tutorials on this topic, but this time I will be providing even more detailed instructions, accompanied by step-by-step illustrations and videos of the drawing process.
Beside, learning how to draw mountains is a great way to understand how to implement lights and shadows into your drawings. You won’t need any ruler, only you, a pencil and a paper!
Do not forget to download the free PDF! Aand.. let’s start!

Step by step mountain drawing

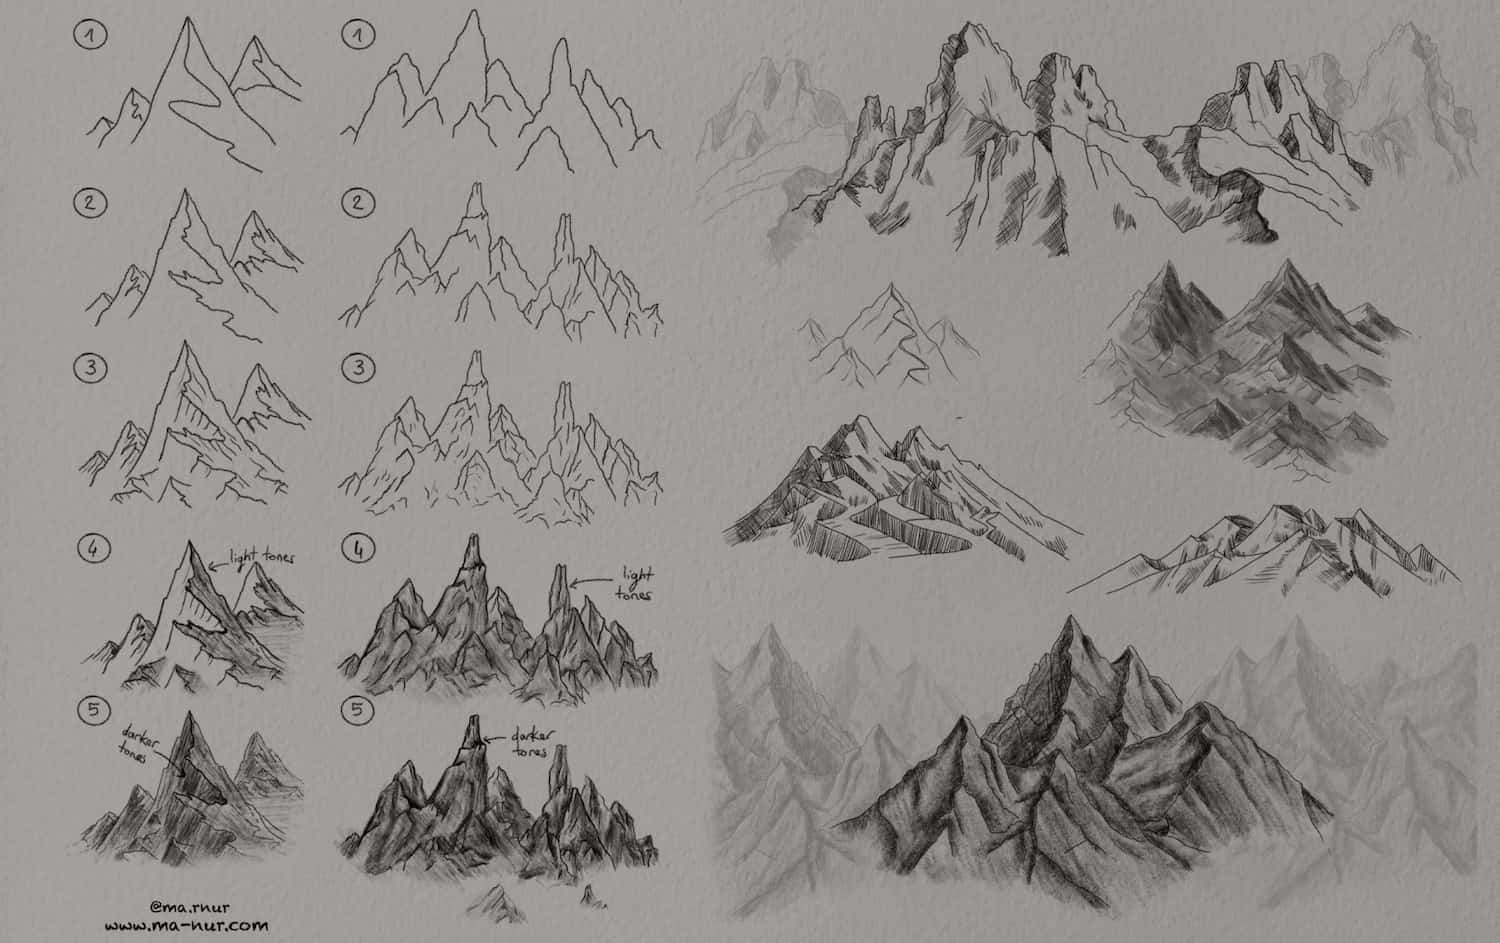
To begin with, start by determining where the tops will be placed on the paper. You can place them high or low, depending on how high you want them to be. Then, make a quick sketch of the mountain’s general form with various wavy lines.

Make some parts of the lines sharper, like peaks to give an effect like you cut or sliced the edges of the mountains. I highly recommend you to look at real pictures of mountains to understand better. You can check here!

Afterwards, add details lines going down from the peaks. Additionally, you can add some more peaks in some parts of the mountains.

Furthermore, the placement of the tones of your shadows will make your range look more natural. Determine which side is receiving the most light. In my case, I decided to make the right part ”the light part”, so the tones are going to be lighter there.

This part is probably one of the most important because this is the part that change everything! Add the darker tones to some part of the mountains. Just imagine where would be the sun in this drawing and according to this, make the parts hidden from the sun, darker.
Tips And Tricks
– To begin with, start your drawing ”lightly”. However, do not push on your pen so this will be easier to erase it if you need.
– It’s ok if it does not look really good in your first try. If you are not satisfied with the result, look at what is bothering and start again!
– To see how real mountains are arranged in the landscape and to get an idea of how you want yours to be, look at images in books or on the internet. On sites like Unsplash.com, you can download royalty-free images for free. Besides, numerous mountain photos are ideal for use as a reference.
– One of the things that holds me from being satisfied with my illustrations is being perfectionist. I think that is why I love drawing anything related to nature. Because nature has not perfect shape, you won’t see any perfect straight line in nature. That’s why I feel completely free while drawing mountains or trees. So, do not try to make it all perfect, don’t be afraid of tracing ”wrong” lines or shaking your hand.
Highlights And Shadows
– Drawing highlights and shadows is probably the most difficult and important part when drawing mountains. Additionally, you have to observe the shape of the rocks of the mountain. The various rocks that stand out of the mountain throw also shadows on each other. With the correct representation of these shadows, you create the three-dimensional form of rock and mountain is. At this point, you need to spend some time in this part as this is what will make a whole difference to your drawing.
Some of my illustrations that I was considering not really good ended up pretty amazing because of the shadings I added. And on the contrary, I messed up some beautiful drawing because of bad shading. Do not underestimate the power of shading.
– It is important to pay special attention to the ridgeline where the light and shadow meet. This is where the highest amount of contrast will be, resulting in being where the viewer’s eye is drawn first.


In Conclusion,
Just have fun when drawing mountains! I hope this post will help you make wonderful mountains illustrations! You can ask me anything or you can check out my other drawings post here! If you want more illustration, I like to share them on my Instagram also!
Do not forget to download this free mountains illustration PDF here!

